
Stop manually installing tools on a fresh Windows machine — declare what you want and let WinGet DSC handle the rest.
I recently got a new work laptop, which meant setting everything up from scratch again — the perfect excuse to finally revise my machine setup and move it to something more maintainable. What I wanted was simple: run one command, walk away, and come back to a fully configured dev box — the same way every time, on any machine.
This post walks through how I got there with WinGet DSC: the declarative config that drives the whole thing, the bootstrapper that makes a fresh machine ready to run it, and the extras — Dev Drive, security hardening, and shell setup — that turn a pile of installers into a single source of truth.
The Problem#
Every developer knows the pain. You get a new Windows machine — or reinstall the OS — and then spend hours clicking through installers, tweaking settings, and trying to remember what tools you had. Maybe you have a checklist somewhere. Maybe you wing it.
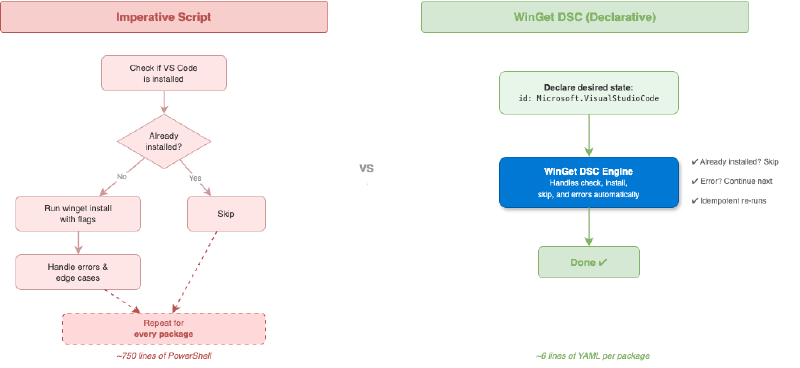
I used to maintain a PowerShell script with dozens of imperative winget install commands. It worked, but it was fragile — if a package was already installed, I needed extra logic to skip it. If a setting was already applied, I had to check first. The script grew to 750+ lines of defensive code.
There’s a better way.
Enter WinGet DSC#
WinGet DSC (Desired State Configuration) lets you describe the desired state of your machine in a YAML file. WinGet reads the file and makes your machine match — installing what’s missing, skipping what’s already there, and configuring settings to your spec.
It’s declarative instead of imperative. You say what you want, not how to get there.
A Simple Example#
Here’s what installing VS Code looks like with WinGet DSC:
properties:
  configurationVersion: 0.2.0
  resources:
    - resource: Microsoft.WinGet.DSC/WinGetPackage
      id: vscode
      directives:
        description: Install Visual Studio Code
        allowPrerelease: true
      settings:
        id: Microsoft.VisualStudioCode
        source: winget
Compare that to the imperative approach:
$output = winget list --id Microsoft.VisualStudioCode --exact 2>$null
if ($output -notmatch 'Microsoft.VisualStudioCode') {
    winget install --id Microsoft.VisualStudioCode --exact --silent `
        --accept-package-agreements --accept-source-agreements
}
The DSC version handles the “is it already installed?” check automatically. Multiply that across 30+ packages and you’ve eliminated hundreds of lines of defensive code.
My Setup: codebytes/windows-setup#
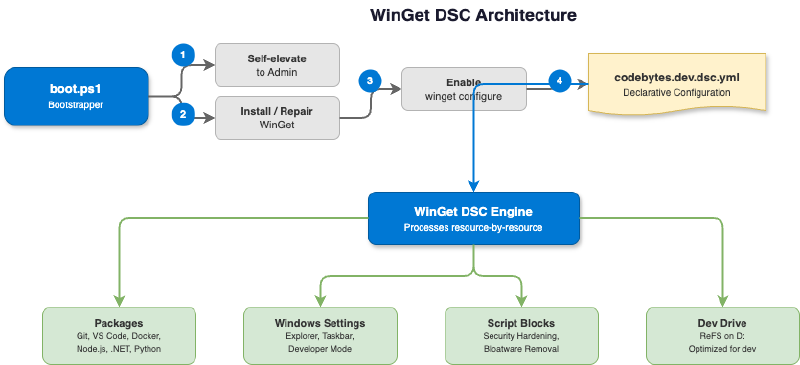
I recently revamped my windows-setup repo to use this pattern, inspired by Scott Hanselman’s wingetdevsetup. Here’s the architecture:
The Bootstrapper: boot.ps1#
The bootstrapper handles the chicken-and-egg problem — you need WinGet to run a WinGet DSC configuration, but WinGet might not be ready on a fresh machine.
boot.ps1 does three things:
- Self-elevates to Administrator (DSC needs admin rights)
- Ensures WinGet is ready using
Repair-WinGetPackageManagerwith a manual fallback - Runs the DSC configuration from a raw GitHub URL with cache busting
$dscBase = "https://raw.githubusercontent.com/codebytes/windows-setup/main/"
$dscFile = "codebytes.dev.dsc.yml"
$cacheBust = "?v=$(Get-Date -Format 'yyyyMMddHHmmss')"
$dscUrl = $dscBase + $dscFile + $cacheBust

winget configure --enable
winget configure -f $dscUrl --accept-configuration-agreements
The Configuration: codebytes.dev.dsc.yml#
The YAML file is organized by category. Here’s what mine includes:
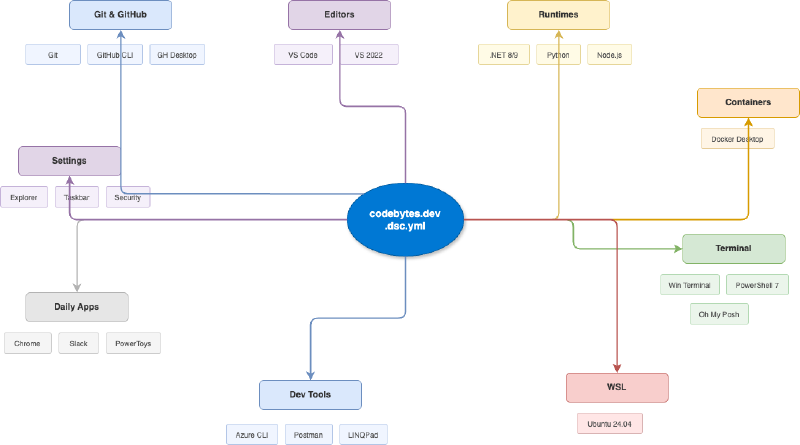
| Category | Packages |
|---|---|
| Git & GitHub | Git, GitHub CLI, GitHub Desktop, GitHub Copilot CLI |
| Editors | VS Code, Visual Studio Enterprise |
| Runtimes | .NET 8, .NET 9, .NET 10, Python 3.12, Node.js |
| Containers | Docker Desktop |
| Terminal | Windows Terminal, PowerShell 7, Oh My Posh |
| WSL | WSL + Ubuntu 24.04 |
| Dev Tools | UniGetUI, LINQPad 8, Azure CLI, Azure Developer CLI, Foundry Local, Ollama, Kusto Explorer |
| Daily Apps | Chrome, PowerToys |
| Personalization | PowerShell profile, Oh My Posh theme, Nerd Fonts, Windows Terminal config |
| Cleanup & Security | Bloatware removal, PUA protection, autoplay/autorun/delivery-optimization disabled |
Beyond Packages: Settings and Scripts#
WinGet DSC isn’t just for packages. You can configure Windows settings declaratively:
    - resource: Microsoft.Windows.Developer/WindowsExplorer
      directives:
        description: Show file extensions in Explorer
      settings:
        FileExtensions: Show

    - resource: Microsoft.Windows.Developer/Taskbar
      directives:
        description: Hide widgets from taskbar
      settings:
        WidgetsButton: Hide
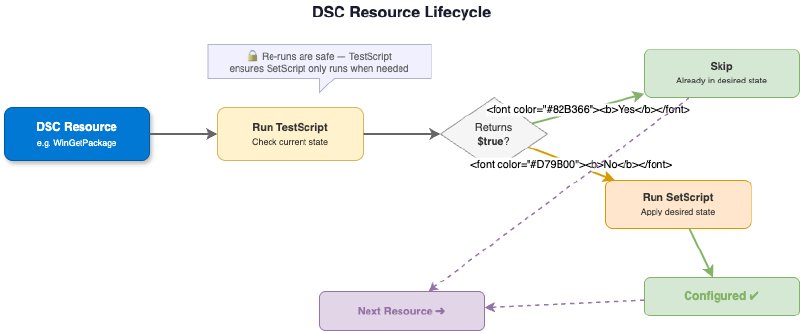
For things without native DSC resources — bloatware removal, registry tweaks, profile setup — you can use PSDscResources/Script blocks with proper TestScript guards for idempotency:
    - resource: PSDscResources/Script
      id: SecuritySettings
      directives:
        description: Enable PUA protection and harden system settings
        allowPrerelease: true
      settings:
        TestScript: |
          try {
            $pua = (Get-MpPreference).PUAProtection -eq 1
            $autoplay = (Get-ItemProperty -Path 'HKCU:\...\AutoplayHandlers' ...).DisableAutoplay -eq 1
            $autorun = (Get-ItemProperty -Path 'HKLM:\...\Policies\Explorer' ...).NoDriveTypeAutoRun -eq 255
            $delopt = (Get-ItemProperty -Path 'HKLM:\...\DeliveryOptimization' ...).DODownloadMode -eq 100
            return ($pua -and $autoplay -and $autorun -and $delopt)
          } catch { return $false }
        SetScript: |
          Set-MpPreference -PUAProtection 1
          # ... registry changes for autoplay, autorun, delivery optimization
The TestScript runs first — if it returns $true, the SetScript is skipped entirely. This is what makes re-runs safe.
Dev Drive#
One of my favorite additions is automatic Dev Drive creation. Instead of repartitioning a physical disk, the config creates a 50 GB VHDX virtual disk and mounts it as D: — no partition changes needed:
    - resource: PSDscResources/Script
      id: DevDrive
      directives:
        description: 'Create Dev Drive VHD on D:'
        allowPrerelease: true
      settings:
        TestScript: |
          # Skip if D: is already available
          return (Test-Path 'D:\')
        SetScript: |
          $vhdPath = 'C:\Users\Public\devdrive.vhdx'
          $vhd = New-VHD -Path $vhdPath -Dynamic -SizeBytes 50GB
          $disk = $vhd | Mount-VHD -Passthru
          $init = $disk | Initialize-Disk -Passthru
          $part = $init | New-Partition -DriveLetter D -UseMaximumSize
          $part | Format-Volume -DevDrive -FileSystem ReFS `
              -NewFileSystemLabel 'Dev Drive' -Confirm:$false -Force

          # Auto-mount on boot via Task Scheduler
          Register-ScheduledTask -TaskName 'Mount Dev Drive' `
              -Action (New-ScheduledTaskAction -Execute 'powershell.exe' `
                  -Argument "-NoProfile -Command `"Mount-VHD -Path '$vhdPath'`"") `
              -Trigger (New-ScheduledTaskTrigger -AtStartup) `
              -Principal (New-ScheduledTaskPrincipal -UserId 'SYSTEM' -RunLevel Highest) `
              -Force | Out-Null
Dev Drive uses ReFS with performance optimizations for developer workloads — faster git operations, faster builds, better antivirus exclusion support. The VHD approach is non-destructive (it skips entirely if D: already exists) and registers a startup task so the drive auto-mounts on boot.
Bloatware Removal#
The config also cleans up pre-installed apps you probably don’t want on a dev machine:
    - resource: PSDscResources/Script
      id: RemoveBloatware
      directives:
        description: Remove selected built-in UWP apps
      settings:
        TestScript: |
          $packages = @(
            'Disney.37853FC22B2CE', 'Microsoft.BingNews',
            'Microsoft.GetHelp', 'Microsoft.Getstarted',
            'Microsoft.MicrosoftSolitaireCollection', 'Microsoft.MicrosoftOfficeHub',
            'Microsoft.WindowsFeedbackHub', 'SpotifyAB.SpotifyMusic',
            'TeamViewer.TeamViewer.Host'
          )
          $found = $packages | Where-Object {
            Get-AppxPackage -Name $_ -ErrorAction SilentlyContinue }
          return ($found.Count -eq 0)
        SetScript: |
          # Remove each unwanted app
Shell Personalization#
The configuration goes further than just installing Oh My Posh — it sets up the full terminal experience:
- Downloads the Oh My Posh theme from the repo
- Creates PowerShell 7 and Windows PowerShell profiles
- Installs Terminal-Icons and z modules
- Installs the CascadiaCode and Meslo Nerd Fonts
- Configures Windows Terminal to use the font
All of this is handled by a single PSDscResources/Script block with dependencies on the terminal tools being installed first.
Running It#
Fresh machine (one command)#
Set-ExecutionPolicy Bypass -Scope Process -Force
$script = Join-Path $env:TEMP 'windows-setup-boot.ps1'
irm 'https://raw.githubusercontent.com/codebytes/windows-setup/main/boot.ps1' |
  Set-Content -Path $script -Encoding UTF8
& $script
From a clone#
git clone https://github.com/codebytes/windows-setup.git
cd windows-setup
.\boot.ps1
After setup#
gh auth login            # Authenticate with GitHub
.\clone-repos.ps1        # Clone your repos to D:\github (falls back to ~/source/repos)
Restart-Computer         # Finish pending installs (WSL, VS, etc.)
The clone-repos.ps1 script checks gh auth status, then clones your repos to D:\github if the Dev Drive is available, falling back to $env:USERPROFILE\source\repos otherwise. It skips repos that already exist.
Customizing for Your Setup#
The beauty of this approach is how easy it is to fork and customize:
Add a package: Find the winget ID (winget search "App Name") and add a resource block.
Remove a package: Delete its resource block from the YAML.
Change VS workloads: Edit the .vsconfig file.
Change the shell theme: Edit codebytes.omp.json.
No PowerShell logic to understand. No control flow to trace. Just a flat list of desired state.
Why DSC Over Imperative Scripts?#
| Imperative Script | WinGet DSC | |
|---|---|---|
| Re-run safety | Manual skip logic per package | Built-in idempotency |
| Readability | 750+ lines of PowerShell | Flat YAML resource list |
| Adding packages | Add function call + skip check | Add YAML block |
| Error recovery | Script stops at first error | Each resource independent |
| Windows settings | Registry hacks | Native DSC resources |
The biggest win is maintainability. Adding a new tool to my setup is a 6-line YAML block instead of debugging PowerShell error handling.
Inspiration#
This approach was heavily inspired by Scott Hanselman’s wingetdevsetup repo. Scott’s been using DSC configurations for his machine setup, and after seeing how clean it was compared to my imperative script, I made the switch.
Key patterns I adopted from his approach:
boot.ps1as a thin bootstrapper that ensures WinGet is ready- DSC YAML as the single source of truth for machine state
.vsconfigfor Visual Studio workload management- Oh My Posh theme stored in the repo for easy version control
clone-repos.ps1as a post-setup step after GitHub auth
Resources#
- codebytes/windows-setup — My setup repo
- shanselman/wingetdevsetup — Scott Hanselman’s setup
- WinGet Configuration Docs — Official Microsoft docs
- Dev Drive Overview — Performance-optimized developer volumes
- DSC Schema Reference — YAML schema for DSC configurations